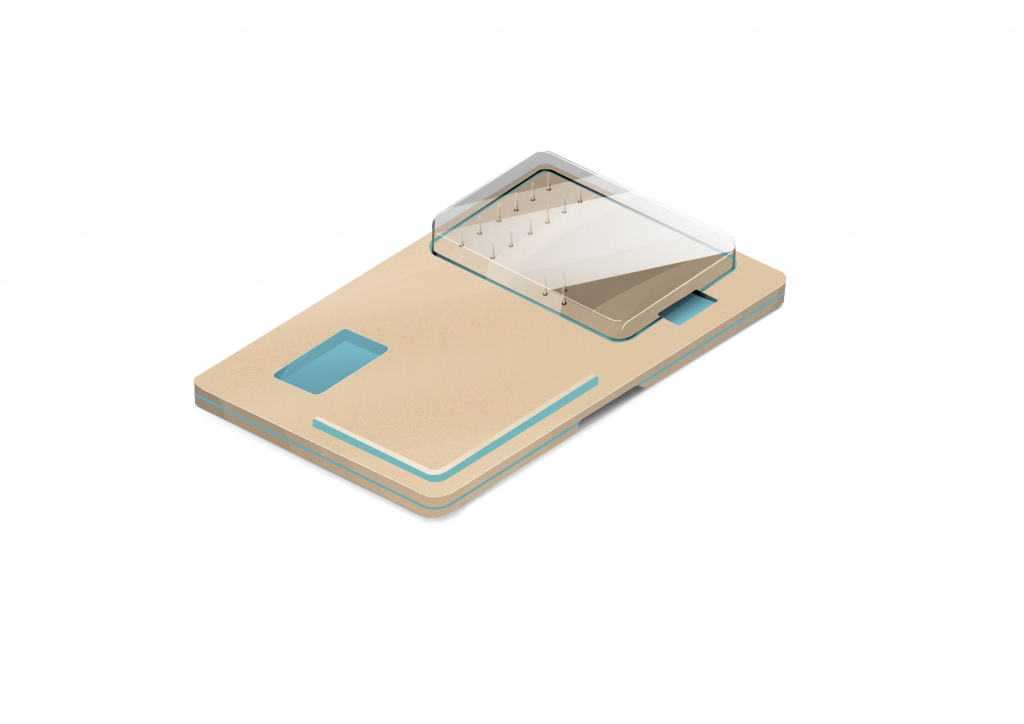
Final Design
Render of SolidWorks model – SnyBoard R
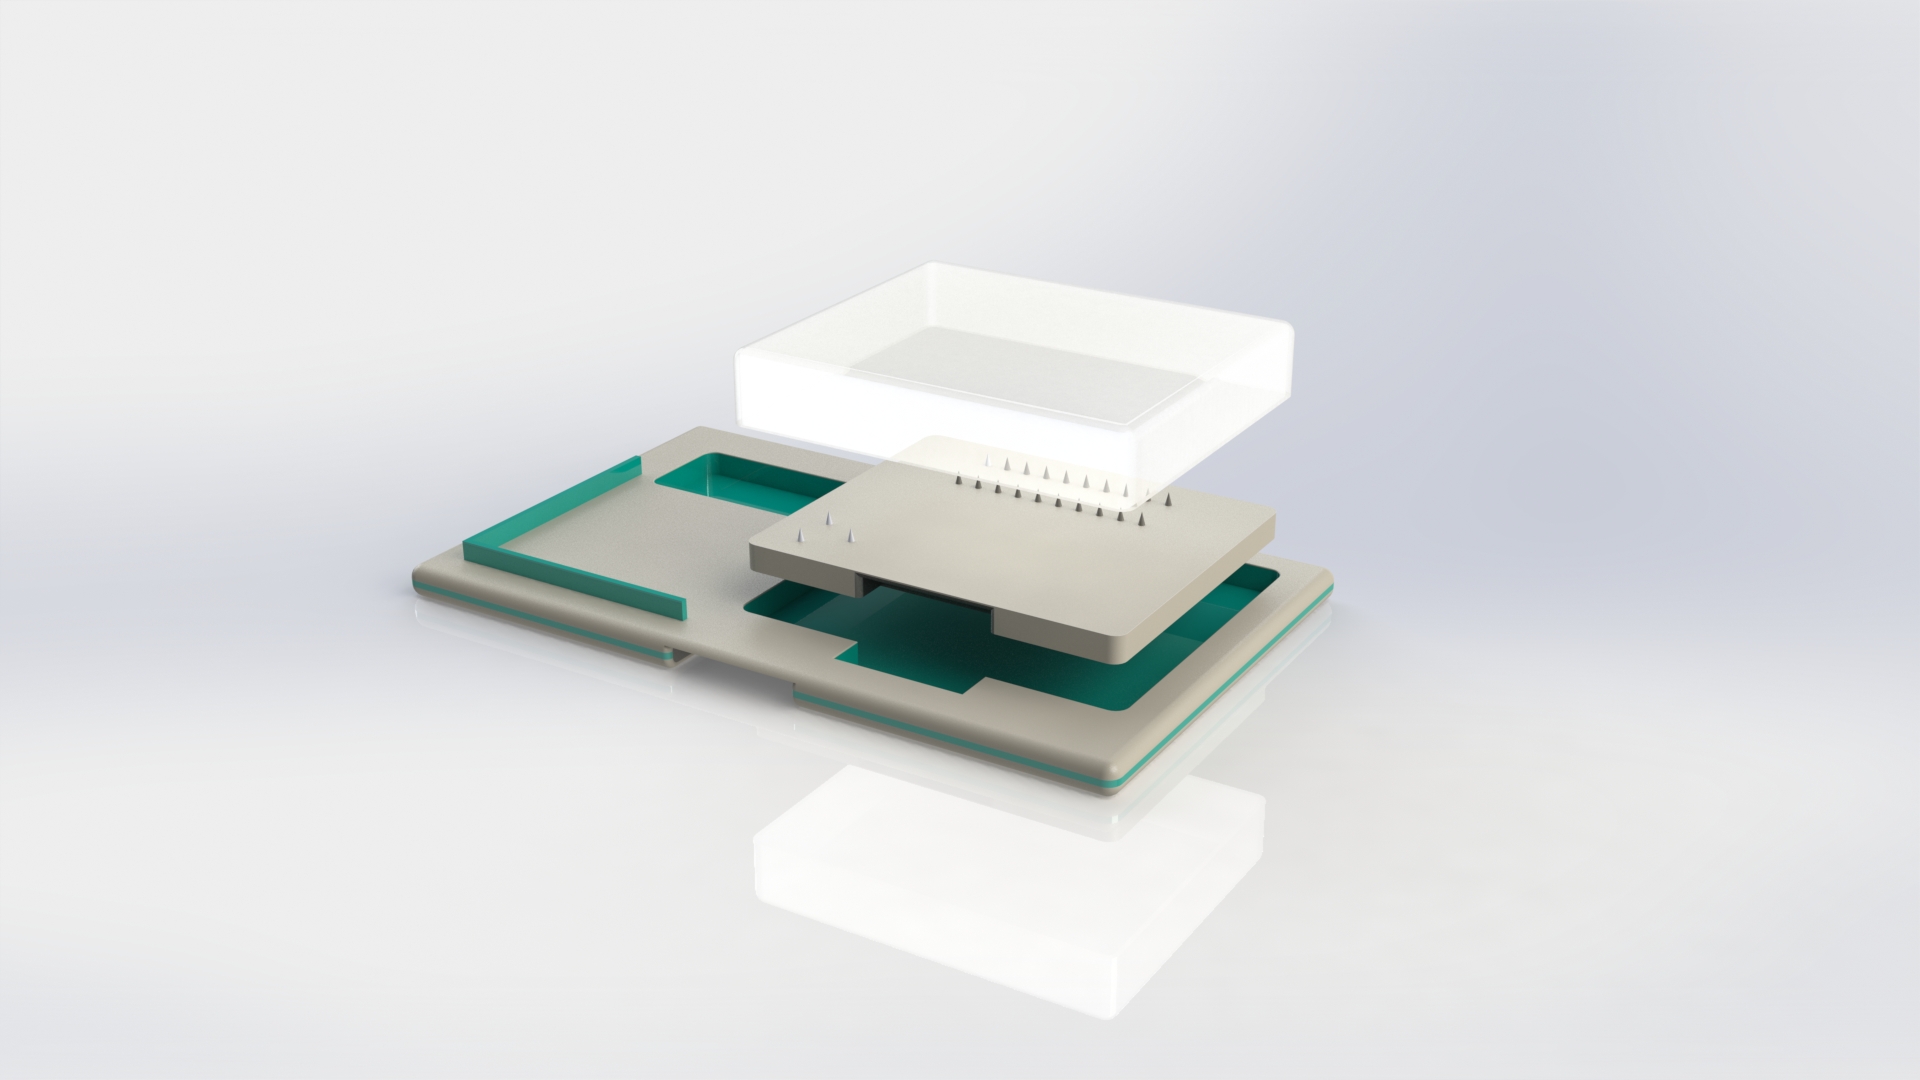
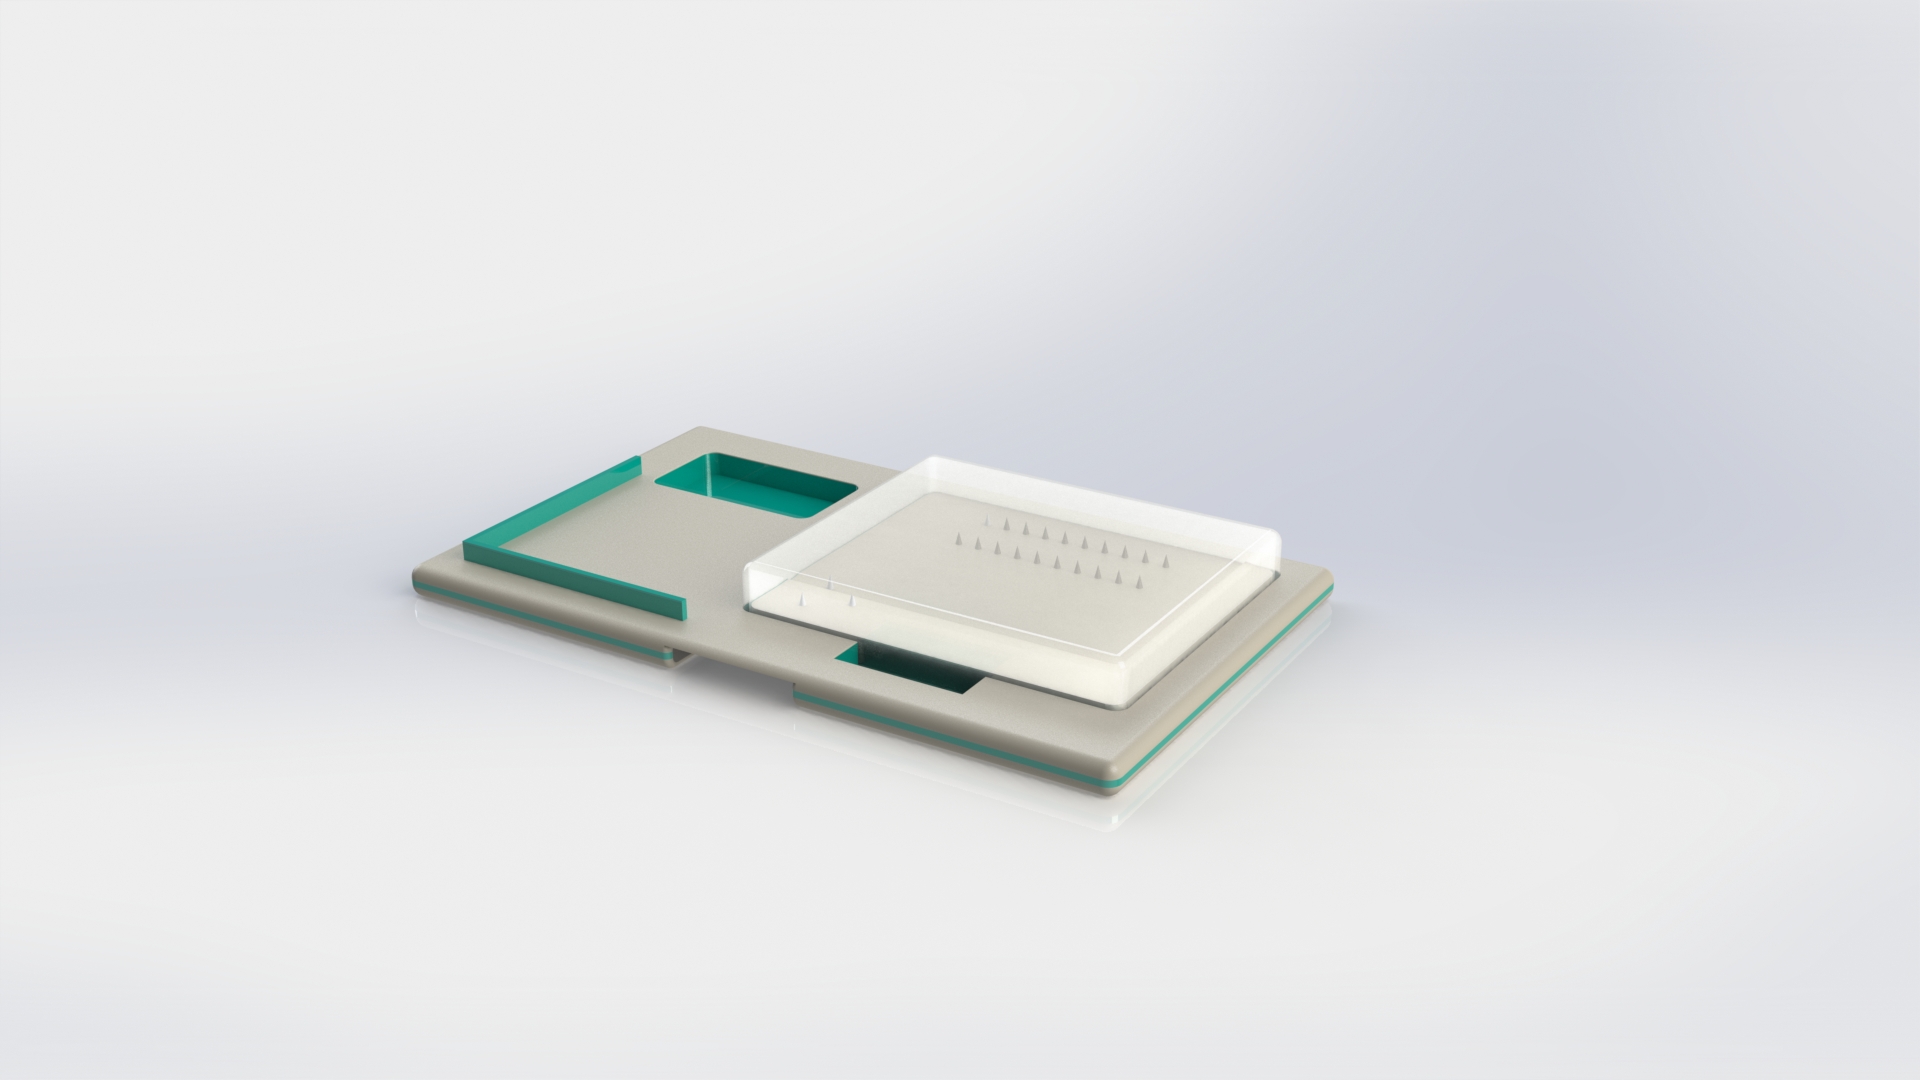
Render of SolidWorks model exploded view – SnyBoard R
How to use for:
A : Cutting Meat
- Take off the safety box (1)
- Put a slice of meat on spikes (3)
- Cut it using the knife and spike pattern
- Remove meat
- Take out the segment (5)
- Clean it by hand or by dishwasher
- Dry
- Close it with a safety box (1)
B : Cutting a vegetable/fruit:
- Take off a safety box (1)
- Put an object on spikes (2)
- Cut it using the knife and spike pattern
- Remove meat
5. Take out the segment (5) - Clean it by hand or by dishwasher
- Dry
- Close it with a safety (1)
C: Making a sandwich
- Put a butter package into cutout (7)
- Open the package
- Put a bread loaf next to the wall (6)
- Grab butter from the package using knife
- Apply butter to the loaf
- Remove a sandwich
- Close a package
- Remove a package back
+ if it required, the surface can be cleaned by hand. The board can be carried by holding cutout (4)
Design Choices
We rounded most of the corners, so it is safe to move around and the case owner can not hurt himself on the sharp edges. Also for safety, we made a cap (1) for the spikes, now when he does not use the cutting board he can not hurt himself on the spikes. We placed the spikes for the fruit and vegetables (2) on the left side, so when he uses the meat spikes (3) he can’t cut himself on the fruit spikes.
The two rows of spikes were chosen to fixate meat. It gives the user enough space in between to cut whilst fixating it. The pattern was chosen by the co-designer as this was what he was used to and had been working for him. The three spikes for vegetables were also taken from his personal experience (his hand-made cutting board).
We made cutouts on the bottom of the board (4) so that he could pick up the board more easily. The cutout is also round, so he can not hurt himself. There is also a cutout on the spike board (5), this is removable, and with the cut out it is easier to take in and out. It is removable so that it is easier to clean.
Because the blank is also used for making bread, we designed some features for this. We made a wall (6) where the bread can rest when making the bread. Above that, there is a cutout (7) for the butter. Because it is in the board, the butter will not move when used. The dimensions are a bit larger than standard 250g butter (10cm x 6cm).
For cleaning the cutting board should be dishwasher safe. Our co-designer owns a dishwasher and finds it difficult to wash objects by hand due to his condition. Internal corners are round to make it easier to clean.
To increase safety, the board should be light so as not to put strain on the co-designer’s shoulder (ruptured tendons cause him pain). To decrease the likelihood of injury, rounded edges were put into the design and a safety box to cover the spikes when not in use. To increase stability of the board during cutting, non-slip rubber pads are underneath. These increase friction on slippery surfaces. This makes cutting easier and safer for the user.
To increase intuitive use of the design different colours were added underneath the cutting plate and in the butter cutout. These different colours along with their shape strongly hint to the user that something can be placed there.
The dimensions of the board are 580mm x 350mm. These were the initial dimensions of the first prototype. The co-designer found it a good size and gave him enough room to comfortably work on the cutting board.
Material Choice
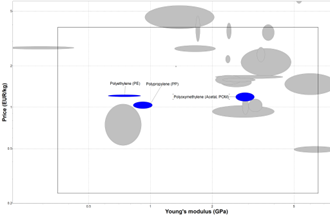
Graph of price (EUR/Kg) against Young's Modulus (GPa)
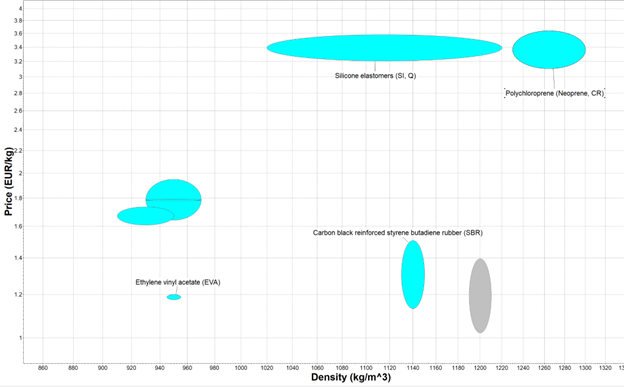
Graph of Price (EUR/Kg) against Density (kg/m^3)
One of the requirements was to be able to clean a board using a dish washer. To choose a perfect material for such goal, the GRANTA EduPack was used. The materials requirement was a melting point above 95 degrees celsius because the maximum temperature during rinsing is between 82 and 88 degrees celsius. Additionally, the materials should be a poor conductor of heat. The material should be durable for water, for salt water, citric acid, vegetable oils and sodium hydroxide 0.6% (a soap). The y-axis is a price since the lower price is desirable, and x-axis is Young’s modulus because the stiff material is desired for proper cutting.
All of the materials are non-toxic for food use. The POM would not be an option because this material is too brittle especially at room temperature. Consequently, our material choice are PE and PP. Both of these materials are in a good price range and have similar values for Young’s Modulus.
For spikes it was decided to stainless steel because that material is used in production of different kitchen utensils.
Then the rubber was analysed. The implemented parameters were the same. The y-axis is a price, x-axis is a density since the product weight is one of the priority.
SBR, EVA, Si and Neoprene can be used because all theses materials are non toxic, but EVA was chosen because it is the lightest and cheapest material.
Name choice
The Dutch name for a cutting board is ‘Snijplank’ and is directly translated while using an English pronunciation for the word ‘snij’ which makes ‘sny’. Adding this together makes for the word Snyboard. Since the cutting board is made for right handed people the letter R is added after Snyboard. Our case owner insisted for future developments to also develop a left handed version of the Snyboard, which can ultimately be called Snyboard L.
Final Concept Sketch