Co-design
During phase 2, the project was focused on participatory design. Co-designer was involved into a design process through different types of co-design methods. These methods were aiming to create a comfortable collaboration space.
Co-design methods
Before choosing the specific methods, firstly it was important to analyze the type of creativity our co-designer has. To do so, the table from one of the workshop sessions was used. By looking at this table and analyzing the discussion of the first meeting with our co-designer, it was concluded that she has 3rd level of creativity. She tried to deliver her own solution for the difficulty that she had by adapting her products for her needs. Thus, the chosen co-design methods aimed at stimulating the analysis of existing solutions, discovering possibilities and sharing the experiences.
Level | Type | Motivated by | Purpose |
1 | Creating | Inspiration | “Express my creativity” |
2 | Making | Asserting my ability or skill | “Make with my own hands” |
3 | Adapting | Appropriation | “Make things on my own” |
4 | Doing | Productivity | “Getting something done” |
Table 1: different levels of creativity in a person, co-design workshop
Our case holder has visual impairment, and after conducting the research we concluded that it is crucial to have verbal discussion and tangible prototypes. Because our co-designer is not fully blind, we decided to also include some of the visual content to facilitate the discussion. It was planned to have at least 2 meetings with co-designer: to discuss ideas and to show prototypes. Because of the differences in schedule, it was difficult to meet frequently with the co-designer, so we asked her to keep track of her daily activities which involved glasses for a week. For us it was important to ensure that our design is feasible, reasonable and comfortable for our co-designer in daily use.
Activities that we implemented:
- Discussing our ideation process and explaining our ideas.
- Making a moodboard together with our co-designer, which will consist of the ideas, mechanisms, solutions, and aesthetical preferences of our co-designer.
- Asking our co-designer to keep a diary to have a better understanding of their everyday activities related to wearing glasses.
Our plan for preparation for co-design sessions:
- Formulate the requirements.
The requirements were formulated based on the context mapping, first meeting with the co-designer and on the feedback from the first presentation. - Conduct subject-related research.
When we started discussing our preliminary ideas, we understood that we had to conduct more in-depth research related to the product that we wanted to design. Thus, we researched more into types of glasses in general (Appendix B), different existing mechanisms (Appendix A) which can be used to customize glasses, and the materials out of which the glasses and their components are usually made (Appendix C). The results of the research were used in preparation of the moodboard and were part of the ideation. The extensive collection of pictures, color palettes and textures of materials was collected to share with the co-designer and consult with their opinion. - Ideate by implementing the results found in the research.
The initial ideation was made using the results from the research, and tried to combine different solutions in one product. - Prepare the required materials for the moodboard.
Co-design results
Second meeting
The co-design session resulted in a better understanding of what would be the ideal product for our co-designer. The moodboard (Figure 12) was made together with the co-designer. It contains the features that were preferred by the co-designer. The moodboard was used to develop the final requirements, as it has more defined information of user experience and each of the components separately.
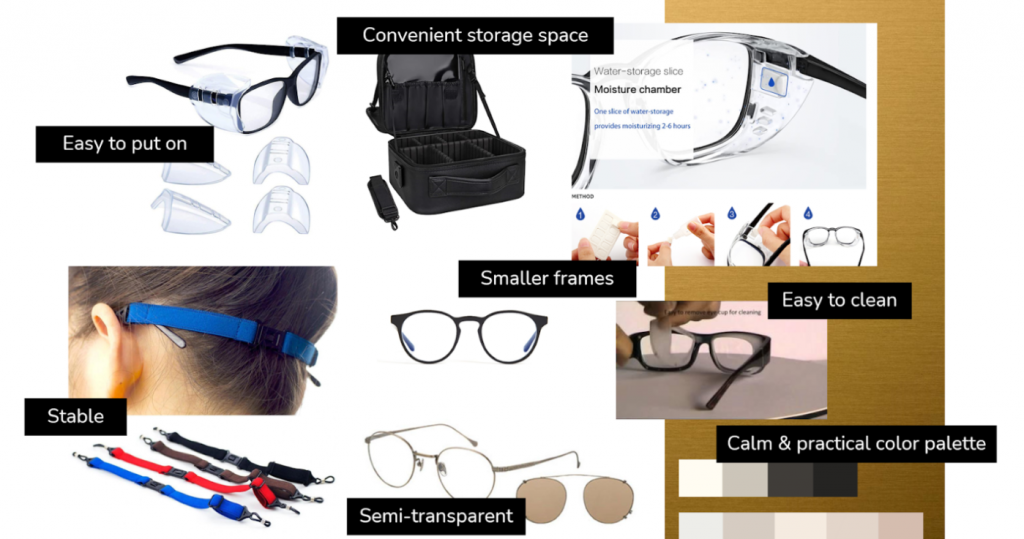
Figure 12; moodboard developed with the co-designer after the second meeting.
It includes the aesthetic preferences of our co-designer. According to our requirements, the glasses should be of a shape and style that our co-designer preferred to make her feel comfortable interacting with the outside world. It was found that she preferred smaller frames and calm color palettes.
According to the co-designer, the ideal pair of glasses should at least:
- Sit firmly on the face
- Have attachable extra pair of lenses and eyecap
- Be easily cleaned
- Have convenient storage space
Diary study
Before starting the design process, it was important to understand the context in which the product will be used. Additionally, not all inconveniences of the existing solutions could be discussed during the meetings. Thus, the co-designer was asked to keep a diary and note when and in what circumstances she will have to wear or change her glasses. The results of the diary study were displayed in this storyboard (Figure 13) which depicts the timeline of her average day:
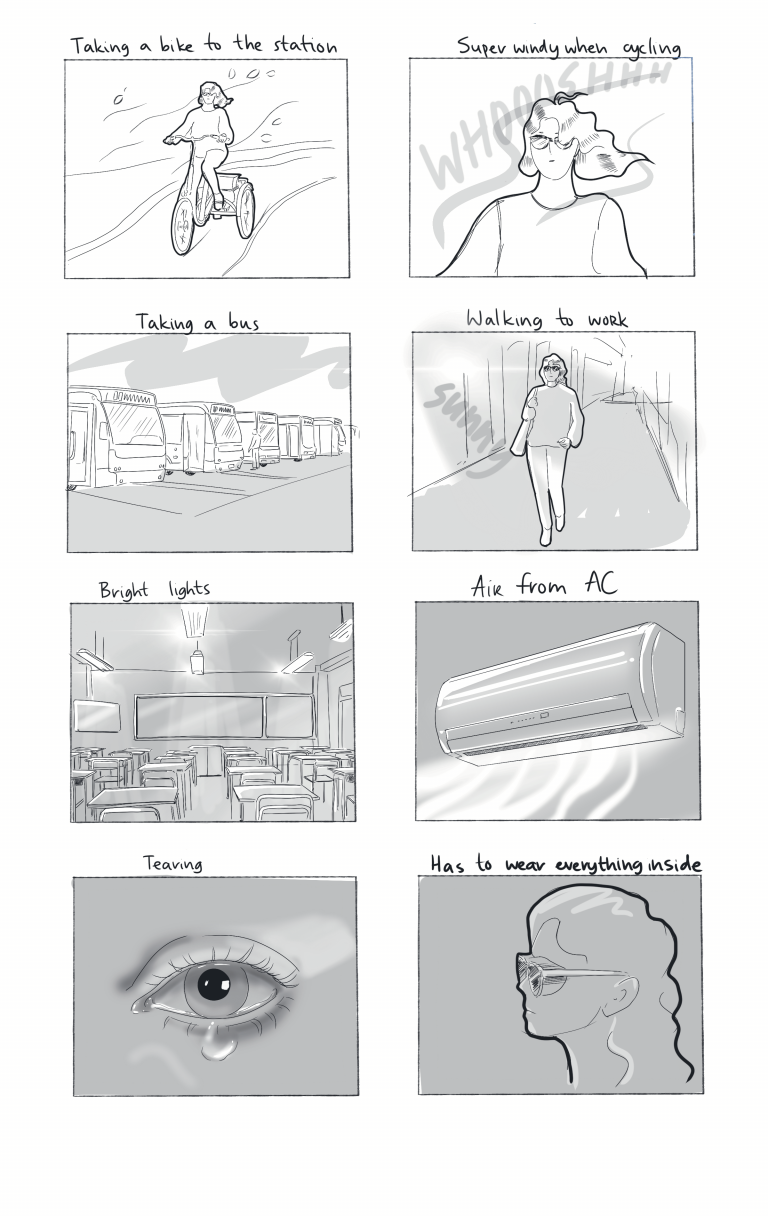
Figure 13; Storyboard dairy co-designer